Sunday 28 December 2014

How to hack any facebook account without NO keyloging pishing required, PASSWORD HACKING

How to hack any facebook account without NO keyloging pishing required, PASSWORD HACKING

How to hack any facebook account easily by Reverting/Reseting pass of your victim NO keyloging pishing required

Here is one more interesting tip on how to hack a Facebook account by the method of reverting the password.This method does not involve any skill or anything just a brain would be enough to get you through this trick ! Well,you might think that it is impossible but it is actually true that you can hack any facebook account ! So before we start i would like to tell you what “Reverting” actually means…


What is Reverting ?

Reverting is the process of resetting a password without the knowledge of the actual user ! So this is basically a low level of hacking but it does the job for you !

For more on reverting go here : What exactly is reverting ?

How do I hack my friend’s Facebook ?

Make sure your not logged in to your account.If you are then make sure you sign out and then follow the following methods

1.Go to this link:

http://www.facebook.com/help/contact.php?show_form=hack_login_changed / http://www.facebook.com/help/contact.php?show_form=hacked_cannot_identify

That is the form that you will be using in order to hack your user.

2.Then in “Your E-mail Address” type your E-mail address.

3.Then apply the following options as in the image below.

4.Once you have done that,You will have a question asking “Email associated with the compromised account.” – In that just type “No” and nothing else other than that !

5.In “Your contact email address.” – Type your own email for you to receive the Password Reset Link.

6.In the “Full Name of the Account.” – Type the Name of your victim if you know.If you don’t then:


a.Try finding the Name of the victim by just searching his/her e-mail on Facebook.

b.If that doesn’t work then google the E-mail address of your Victim,that might give you some details.

c.If that also doesn’t work then use the following sites to get them

http://com.lullar.com/ http://www.pipl.com/email/

So if you follow one of the above methods you should be getting the Full Name of your victim.Now lets move on to the next step

7.”Date Of Birth” – In this column you have to enter the Birthday of your Victim.If you know him personally then you should be knowing it.If not you can just social engineer him and somehow make him tell it.Once you get it you have to enter it in that.

8.”URL (web address) of your compromised profile.” – This is just the profile URL of your Victim which can be got easily(Usually of the form: http://www.facebook.com/profile.php?id=99999)

9.Now your all set ! Before you submit the form just make sure you recheck the whole form if you have done the right thing.Once you do so just click on “Submit”


10.Thats it ! You have done it ! Now you just have to wait for Facebook team to look up for your request ! Once they approve it they will send a link to reset your victim’s Password !

How to restore Windows 8.1 from a System Image Backup

How to restore Windows 8.1 from a System Image Backup

First, you need to get into Windows 8.1 Recovery Environment (WinRE) using Recovery Drive or bootable Windows 8.1 installation DVD. If Windows is running, you can invoke Settings charm (keyboard shortcut WINDOWS KEY+I), click Power and hold down SHIFT key while clicking Restart.
Detailed instructions are included in Repair your computer in Windows 8 and 8.1 tutorial.
Click or tap Troubleshoot in Choose an option screen, then choose Advanced Options in Troubleshoot screen.
Windows 8.1 Recovery Environment, Troubleshoot. Click 'Advanced options'.Windows 8.1 Recovery Environment, Choose an option. Click Troubleshoot.
Next, in Advanced options screen, click or tap System Image Recovery, and choose Windows 8.1.
Windows 8.1 Recovery Environment, Advanced options. Click 'System Image Recovery'.

Scheduling System Image Backup in Windows 8.1

Scheduling System Image Backup in Windows 8.1 

While it is not recommended to schedule System Image Backups in Windows 8.1, you might prefer to do so if you have more than one external hard drive dedicated for backups.
In such case, you can manually create one backup on the first drive (for example, drive F:) and leave it untouched forever - this will be your fail-safe backup right after installing and updating Windows and necessary software (you should use File History for backing up your personal files and folders). Then schedule a PowerShell command that creates and updates backup on a different physical drive (for example, drive E:) on weekly basis.
To use this advanced scenario, use keyboard shortcut WINDOWS KEY+Q to open Search everywhere, type schedule and click Schedule tasks.
Windows 8.1, Search everywhere. To automate System Image Backup, type 'schedule' and click or tap 'Schedule tasks'.
Right-click Task Scheduler Library and select Create Basic Task from the menu.
Windows 8.1, Task Scheduler. Right-click 'Task Scheduler Library' and click 'Create Basic Task' to add an automation job.
In the Create Basic Task Wizard window, type Name for the new task. Description is optional.
Click Next after you're done.
Windows 8.1, Create Basic Task Wizard. Enter Name and Description. Then click Next.
Set Task Trigger to Weekly and click Next. If programs and apps on your Windows device change rarely, you can select Monthly instead.

 Windows 8.1, Create Basic Task Wizard, Task Trigger. Select 'Weekly' and click Next.
Because creating a system image slows your PC down for quite some time, choose a start time when your machine is most probably not in heavy use.
Click Next again.
Windows 8.1, Create Basic Task Wizard, Task Trigger Weekly. Set a start time and click Next.

Leave Start a program selected for Action and click Next.
Windows 8.1, Create Basic Task Wizard, Action. Leave 'Start a program' selected and click Next.
Type powershell.exe into Program/script field and then copy and paste the following line into Add arguments (optional) field:
wbAdmin start backup -backupTarget:E: -include:C: -allCritical -quiet
Replace drive letter E: in the -backupTarget argument with the appropriate one for your backup destination disk if necessary.
Because Windows 8.1 always assigns drive letter C: to system drive (the one where Windows is installed), changing this one is not needed.
The -allCritical option includes everything (additional partitions/volumes or drives) required to start and run Windows properly in the backup. I guess you all know what -quiet means.
Windows 8.1, Create Basic Task Wizard, Action, Start a Program. Type 'powershell.exe' for Program/script. Enter 'wbAdmin start backup -backupTarget:E: -include:C: -allCritical -quiet' into 'Add arguments' field. Click Next.

In the final screen of Create Basic Task Wizard, tick the Open the Properties dialog for this task when I click Finish check box and click Finish
Windows 8.1, Create Basic Task Wizard, Finish. Put a check mark into the 'Open the Properties dialog for this task when I click Finish' check box and click Finish.
In the Security options section of Task Properties window, select the Run whether user is logged on or not option and tick the Run with highest privileges check box. Then click Change user or Group button next to the When running the task, use the following user account field.
Windows 8.1, Task Properties. Enable the 'Run whether user is logged on or not' and 'Run with highest privileges' options. Then click 'Change User or Group'.
Type system into Enter the object name to select field and click Check Names. The name turns into all capital letters and gets underlined. Click OK.
Windows 8.1, Task Properties, Select User or Group. Type 'system' and click 'Check Names'. Then click OK.
Back in the Task Properties window, open setting tab and enable the Run task as soon as possible after a scheduled start is missed option. This ensures that the backup is always created.
Windows 8.1, Task Properties, Settings tab. Turn on the 'Run task as soon as possible after a scheduled start is missed' option. Then click OK.
Finally, click OK to save the task changes. Make sure that the destination drive is always connected during the scheduled time.
To verify that the backup task runs and finishes properly, open WindowsImageBackup folder on the target drive. There should be a subfolder with your computer's name - open it and then open another subfolder, Logs, and see if the Backup_error_<date and time>.log file is empty. If it is, the backup finished successfully.
Please note that you might have to use administrative privileges to open the folders for the first time.
Windows 8.1, File Explorer. The 'WindowsImageBackup\<your PC name>\Logs' folder contains log file for the latest System Image Backup.
Another way is to check backup log in Event Viewer. Use keyboard shortcut WINDOWS KEY+X to open Quick Links menu and click Event Viewer. Alternatively, right-click or tap and hold the Start tip on Taskbar.
Windows 8.1, Quick Links menu.
Expand Applications and Services LogsMicrosoftWindowsBackup items and click Operational. You'll then see the list of events related to backing up your device. Here are some most common backup events in Windows:
  • Event ID 1 - The backup operation has started.
  • Event ID 4 - The backup operation has finished successfully.
  • Event ID 5 - Backup started at <date and time> failed with following error code <number>.
  • Event ID 8 - Backup cancelled.
  • Event ID 14 - The backup operation has completed. This event appears even if backup was cancelled or did not finish successfully.
  • Event ID 20 - Backup started at <date and time> failed as another backup or recovery is in progress.
  • Event ID 50 - Backup failed as required space was not available on the backup target. Free up some disk space on the target drive or increase available disk space on Windows disk.

Windows 8.1, Event Viewer. Event Properties - Event 4, The backup operation has finished successfully.


Create for System Image Backups in Windows 8.1

Create for System Image Backups in Windows 8.1

Clearly, Microsoft wants you to use File History, OneDrive (aka SkyDrive) and maybe even Storage Spaces for storing, syncing and backing up your personal files, and Refresh your PC or Reset your PC for restoring Windows to a working state. Maybe that is why System Image Backup is so difficult to find in Windows 8.1.

Here are a few things you should know about system images in Windows 8.1:
  • You can create only one System Image Backup on a drive: any previous versions will be overwritten.
  • There is no easy way of scheduling image backups, and for the previous reason, it is not really recommended either. You do not want to automatically overwrite a good system image with image of a computer that does not run properly.
  • System Image Backup cannot be used for restoring individual files or folders: restoring the image means overwriting everything on the target drive. File History is the proper solution for backing up and restoring personal data in Windows 8.1.

Using DISM to verify that Windows Component Store is intact


Before you create a full backup, it is strongly recommended to check for corruption in Windows Component Store - there is no point in backing up a broken installation that will probably fail in the near future.
Open elevated Command Prompt: either open Start screen, type cmd, right-click on Command Prompt and select Run as administrator; or if you've set to display Command Prompt in Taskbar Navigation settings, use keyboard shortcut WINDOWS KEY+X to bring up Quick Links menu (a list of commands for power users) and click Command Prompt (Admin).


In the black window, type or copy-paste the following command to have DISM (Deployment Imaging and Servicing Management) tool verify the integrity of Component Store: Dism /Online /Cleanup-Image /ScanHealth . Press ENTER key to launch the command.
The check takes up to 15 minutes to complete, and if the result reads "No component store corruption detected", you have the green light to create the System Image Backup

If the result reads "The component store is repairable" instead, type Dism /Online /Cleanup-Image /RestoreHealth and pressENTER key to fix the corruption. The process can last up to 15 minutes again and positive result reads: "The restore operation completed successfully. The component store corruption was repaired." Move on to the System Image Backup creation then.


In case the RestoreHealth command fails no matter what, it is best to perform a non-destructive reinstall of Windows 8.1. This seems to be the only solution to the infamous DISM error 0x800f081f.

Creating a System Image Backup in Windows 8.1

To access the feature, open Search everywhere (keyboard shortcut WINDOWS KEY+Q), type File History and click the result.
Yes, you read it right: "File History". Smile Also, connect your external hard drive with plenty of available disk space now.

Click the link titled System Image Backup in the bottom left corner of the File History window.
First, System Image Backup looks for available DVD-writers and hard drives. While you can use network drives for backing up your PC, it is not recommended because backed up data cannot be securely protected for a network target.
I cannot recommend using DVD-s for backups, either - optical media is vulnerable to scratches that might ruin the whole backup set, so the only usable option here is hard disk drive.
In accordance with common sense, you cannot create a system image on the same physical drive where Windows is installed. You see, if this hard drive goes bad, you would lose both Windows and all backups.
In the Create a system image window, select On a hard disk. The best one might be already selected, but you can change the target drive using the combo box.
I recommend using destination drives that are connected to standard controllers (not SCSI, SAS, RAID and other controllers that Windows cannot automatically recognize or find driver for) or standard USB ports.
If you've created a system image on the selected drive before, there will be a line stating "Most recent backup on drive:" beneath the combo box. Here's the catch: previous system image will be overwritten, so you can really have only one backup at a time on the same drive.
Click Next.

Windows then lists your backup location and size, plus drives/partitions that will be backed up.
Again, if there is a previous system image on the drive where you want to back up your PC, a yellow warning sign with the text "Any existing system images for this machine might be overwritten" appears.
Click Start backup if you're satisfied with the settings.


Depending on the size of selected drive(s), the backup might take several hours. Click Close after it is complete.


.

Sunday 21 December 2014

Fix problem – .exe file stopped working in window 7

Fix problem – .exe file stopped working in
window 7.
Someone got this ‪#‎problem‬ when he want to
install one of the software.
Don’t worry just
implement following steps and you are done.
Here are the steps:
Steps to Fix problem – .exe file
stopped working in window 7:
1) Go to control panel->System and
security ->system
2) Now click advanced system settings.
3) Now system properties dialog box will
appear then go to advanced tab -
>performance ->settings.
4) Now a performance options dialog box will
appear then you have to go to Data
Execution prevention(DEP).
5) After doing so, enable Turn on Data
Execution prevestion for all programs and
services except those I select, as shown
below:
6) Then click Add and choose(browse) the file
that you want to fix.
7) Then click Apply and Ok.
That’s it. Hope, after implementing this you
would have solved the problem. If not, then feel free to comment below// 

all windows serial keys

All Windows serial keys for you..
enjoy: )
Windows 8.1 Professional
GCRJD-8NW9H-F2CDX-
CCM8D-9D6T9
Windows 8.1 Professional N
HMCNV-VVBFX-7HMBH-CTY9B-
B4FXY
Windows 8.1 Enterprise
MHF9N-XY6XB-WVXMC-BTDCT-
MKKG7
Windows 8.1 Enterprise N
TT4HM-HN7YT-62K67-RGRQJ-
JFFXW
Windows 8 Professional
NG4HW-VH26C-733KW-K6F98-
J8CK4
Windows 8 Professional N
XCVCF-2NXM9-723PB-
MHCB7-2RYQQ
Windows 8 Enterprise
32JNW-9KQ84-P47T8-D8GGY-
CWCK7
Windows 8 Enterprise N
JMNMF-RHW7P-DMY6X-RF3DR-
X2BQT
Windows 7
Windows 7 Professional
FJ82H-XT6CR-J8D7P-XQJJ2-GPDD4
Windows 7 Professional N
MRPKT-YTG23-K7D7T-X2JMM-
QY7MG
Windows 7 Enterprise
33PXH-7Y6KF-2VJC9-XBBR8-HVTHH
Windows 7 Enterprise N
YDRBP-3D83W-TY26F-D46B2-
XCKRJ
Windows 7 Enterprise E
C29WB-22CC8-VJ326-GHFJW-
H9DH4
*Windows Server 2012 R2
Windows Server 2012 R2 Server
Standard
D2N9P-3P6X9-2R39C-7RTCD-
MDVJX
Windows Server 2012 R2
Datacenter
W3GGN-FT8W3-Y4M27-J84CP-
Q3VJ9
Windows Server 2012 R2 Essentials
KNC87-3J2TX-XB4WP-VCPJV-
M4FWM
*Windows Server 2012
Windows Server 2012 Core
BN3D2-R7TKB-3YP
BD-8DRP2-27GG4
Windows Server 2012 Core N
8N2M2-HWPGY-7PGT9-HGDD8-
GVGGY
Windows Server 2012 Core Single
Language
2WN2H-YGCQR-KFX6K-
CD6TF-84YXQ
Windows Server 2012 Core Country
Specific
4K36P-JN4VD-GDC6V-KDT89-
DYFKP
Windows Server 2012 Server
Standard
XC9B7-NBPP2-83J2H-
RHMBY-92BT4
Windows Server 2012 Standard
Core
XC9B7-NBPP2-83J2H-
RHMBY-92BT4
Windows Server 2012 Multipoint
Standard
HM7DN-YVMH3-46JC3-XYTG7-CYQJJ
Windows Server 2012 Multipoint
Premium
XNH6W-2V9GX-RGJ4K-Y8X6F-QGJ2G
Windows Server 2012 Datacenter
48HP8-DN98B-MYWDG-
T2DCC-8W83P
Windows Server 2012 Datacenter
Core
48HP8-DN98B-MYWDG-
T2DCC-8W83P
*Windows Server 2008 R2
Windows Server 2008 R2 HPC
Edition
FKJQ8-TMCVP-FRM
R7-4WR42-3JCD7
Windows Server 2008 R2
Datacenter
74YFP-3QFB3-KQT8W-
PMXWJ-7M648
Windows Server 2008 R2
Enterprise
489J6-VHDMP-X63PK-3K798-CPX3Y
Windows Server 2008 R2 for
Itanium-
Based Systems
GT63C-RJFQ3-4GMB6-BRFB9-CB83V
Windows Server 2008 R2 Standard
YC6KT-GKW9T-YTKYR-T4X34-
R7VHC
Windows Web Server 2008 R2
6TPJF-RBVHG-WBW
2R-86QPH-6RTM4

How to protect our SD Card/USB and how to remove protection from it.

How to protect our
SD Card/USB and how to remove
protection from it.
You don't have to
download or install any 3rd party
software to do that.. It can be easily
handled by using command prompt.
Just follow the steps mentioned
below :
A. To Enable Write Protection:
1. Open command prompt.
(Start>Run>cmd>Enter)
2. Now type "diskpart" and hit enter. It
will ask for administrator permission.
Click Yes.
3. Now type "list disk" and hit enter. It
will list your disks. Note the number
of your SD Card/USB from that list (It
can be easily recognized by size of the
disk. e.g. 4GB = 3819MB)
4. Now type " Select disk x". where x is
the number of disk. In my case, x=2.
5. Now type "attributes disk". It will
show the properties of your disk.
6. Now type "attributes disk set
readonly".
7. Congratulations, Your disk is now
write protected.
Enable Write Protection
B. To Disable Write Protection:
1. Repeat step no. 1-5 which is shown in
"To Enable Write Protection".
2. Now type " attributes disk clear read
only". It will remove write protection
gfrom your SD Card/USB.

Best Free Sites to find Any Softwares Serial Keys

How To Hack & Access Same LAN Computers?

How To Hack & Access Same LAN Computers? 
If you are working in Office / Colleges and 
want to hack your
friends & college mate PC then here is a trick.
First Step press win R
Go to Run> Type Cmd
now type command
net view
It will be look as below
C:\>net view
Server Name Remark
-----------------------------------------------
\\xyz
\\abc
Here you can get all the names of all the computers machine names which connect with your LAN.
Now you got the name. Lets start hacking into the systems.
After you get server name now type tracert command for knowing IP of the victim machine.
Example: C:\> tracert xyz
Here you get the IP address of the XYZ computer machine.
Now go to windows start button and type Remote Desktop Connection
After click on Remote Desktop Connection.
Now type the IP address or computer name of victim machine.
Click on Connect <-|
It will also ask administrator password which is common as usual you known about.(or) you
can prefer our previous posts.
After few second Victim machine shown in your Computer.
Now you can access that machine to open website, files, Software's, etc

Sunday 14 December 2014

Recovering unallocated space of a USB flash drive.

Recovering unallocated space of a USB flash drive.

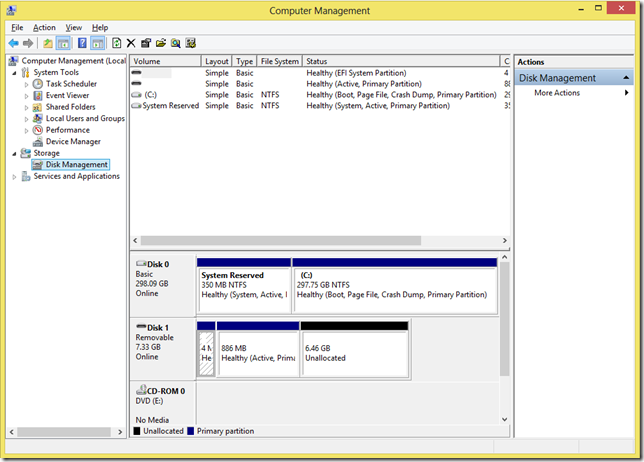
Today I played with the latest SUSE Linux Live. I had not have a DVD drive and used USB flash drive instead. I wanted to reformat my flash drive, but suddenly found it that it had not been possible. The most of the disk space had been unallocated, and my Windows 8 did not allow me to use it.
Unfortunately Windows does not support Fdisk anymore. But there is another good command line tool to solve this problem. The tool’s name isDiskPart. I would say it is the next generation of Fdisk tool. DiskPart provides you information about your partitions and volumes, allows you to delete and create partitions, extend NTFS volumes, etc.
Let’s remove unallocated space. First of all run Windows command line and type diskpart in the command prompt. Windows will ask you for Administrator permissions to run the tool. Then run list disk command to find your USB flash disk’s number. It should be the same as disk’s number in Computer Management tool. It was 1 in my case. Next you should chose the disk to work with. Type select disk <disk number>command, e.g. select disk 1. The next step is to clean all volumes and partitions on the disk. Use clean command to do that. The last step is to create a primary partition. You can do that using create partition primary command. That’s all. You should be able to format your flash disk now.
This is how I removed unallocated space on my machine:
Microsoft DiskPart version 6.2.9200
Copyright (C) 1999-2012 Microsoft Corporation.
On computer: COMPUTER
DISKPART> list disk
  Disk ###  Status         Size     Free     Dyn  Gpt
  --------  -------------  -------  -------  ---  ---
  Disk 0    Online          298 GB      0 B
  Disk 1    Online         7509 MB  6619 MB
DISKPART> select disk 1
Disk 1 is now the selected disk.
DISKPART> clean
DiskPart succeeded in cleaning the disk.
DISKPART> create partition primary
DiskPart succeeded in creating the specified partition.
DISKPART> exit